Friday, February 28, 2014

A Simple Wikispaces Cheat Sheet / Zachary Griffin

Basic Wiki Cheat Sheet

Welcome to the Basics of a Wiki! Here we will guide you through several easy steps on how to use Wikispaces.

Home Page Edit Tool

Below is a picture of five edit features you can use for your convenience. If you want to create a new page, for example, all you have to do is click on the Page icon, enter a name, and your page will be created! Below is a detailed list of each icon and what their uses are for a Wiki page.

Member/Avatar: This displays your user profile photo. This allows the viewers to know who created or edited content on a particular page.
Create New Page: Add a new page to your Wiki. After you enter the name of your page, it will show up on your navigation menu.
Add Files To Storage: Allows you to add files to your Wikispaces storage.
Create Discussions On Homepage: Creates new posts on a page for users to hold on a discussion.
Create Project: Develop a new project for your Wiki that will also show up under your Events page.
Create Events: Create an event that will be displayed on your Wiki Calendar for users to view.

Members: Allows the creator the Wiki page to add members to their site. Members can view, contribute, 
and even edit the Wiki depending on what level of privilege the creator gives them. All you have to do is click on the “Invite People” tab on the Members page and you will be prompted to enter their email address for an invitation.

Projects: Creating a project is very simple, all you have to do is click on the “Create Project” tab and it will
 show up on your Projects page. Projects allow you to assign teams to users as well as a page to edit if need be. Users can show their work on these pages and even create new ones that will be linked from their teams page.

Events: Events allow you to alert other users on your Wiki about things that are upcoming, such as projects or exams. Events are added to your Calendar, which can be viewed on the Events page.

Assessment: The Assessment page allows you to view the activity of each user on your Wiki. If a user is active, it will show the times and dates of their activity.

Settings: Allows the user to manage the general settings of their Wiki. Features such as themes, domain name, pages, ext. can all be managed on this page.
Creating Links

Creating Links: Creating links out of text on your Wiki is simple! All you have to do is copy the url you wish to link, highlight your text on your Wiki page, and click on the “Link” button. Once you are in the link window, you can choose what kind of link you want to use. “Page or File” creates a link to a file you uploaded onto your Wiki storage, Web Address creates a link to a webpage, and Email address creates links to emails.

Step 1: Edit Tab
Click on the edit tab on the top right corner of the page you wish to add a link to. This turns the page into edit mode, which allows you to change any content the page contains.
Step 2: Highlight your text you wish to link
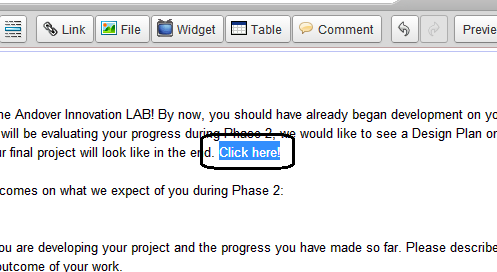
Highlight over the text you wish to turn into a link. Also ensure you copy the url of the link you want to use.

Step 3: Link tab 
With your text highlighted, select the Link tab on your toolbar. This will open a window.
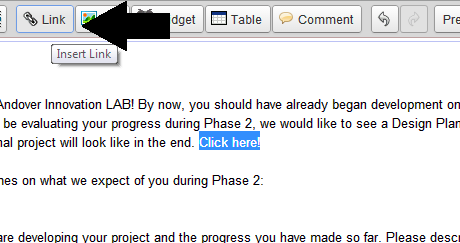

Step 4: Select your type of Link
Select your type of link, between a file, website, or email address, and paste your desired url inside of the Address bar. Your highlighted text should appear in the Link Text bar as shown below.
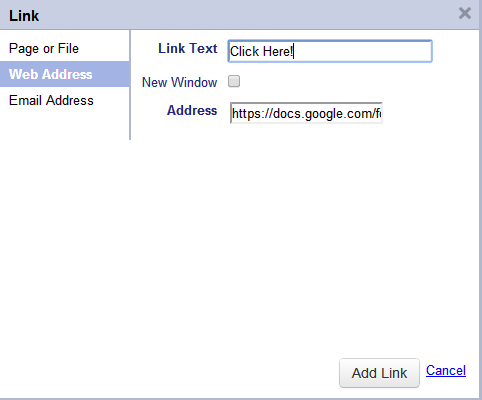

Step 5: Test your link
Now that your link appear on your page, click on it and select visit. Your link should now work properly.
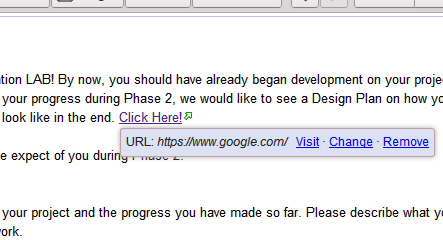

You should now have clickable links on your page! Linking an email or file from your storage works the same way as you would link your address.

Importing Content & Images

Using the tool bar under edit mode is a very efficient way of managing your content. The Widget tool allows you to import music, videos, and other kinds of media files to your page, and other tools like the spell checker, File uploader, and font editors will prove to be very helpful when structuring your content.

Font Editor Tools

Like most user-interfaces on any major application you use such as Google Forms or Microsoft Office, the

tool bar on Wikispaces has all of the essential editing tools needed to manage your content the way you see fit.

Links, Formatting & Importing

While the tool allows you to format your text, you can also create links, load images, upload videos, and many other things using these features of the toolbar. Remember to always press Save on the right when you are finished working on something!

Navigation With Editing

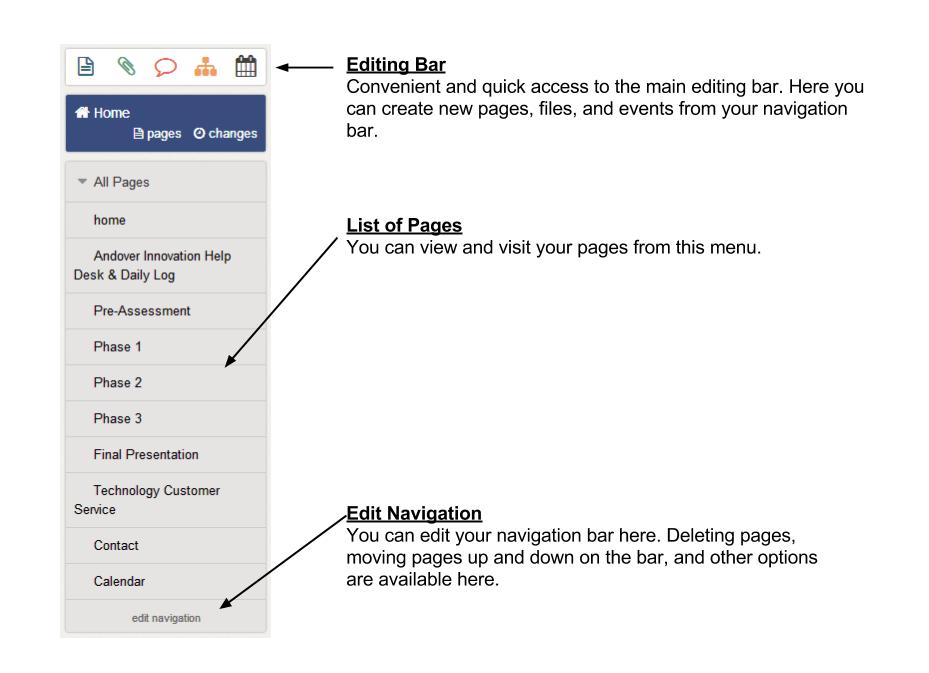
You can navigate and edit your navigation menu at your own leisure using the edit navigation tool, and the Pages and Changes buttons allow you to view edits, files, and all of the pages on your Wiki.
Calendar

You can view your calendar under your Events page. When adding a new event, it will automatically show up on your Calendar, which can be edited at any time.
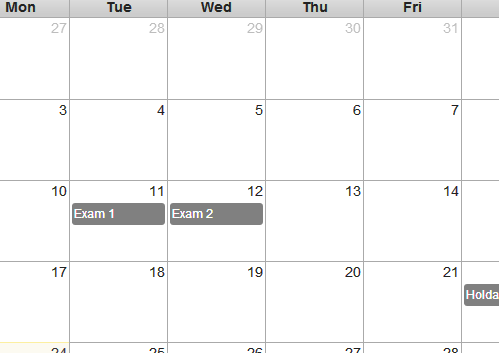

You can also import your Google Calendar into your Wiki if you wish.
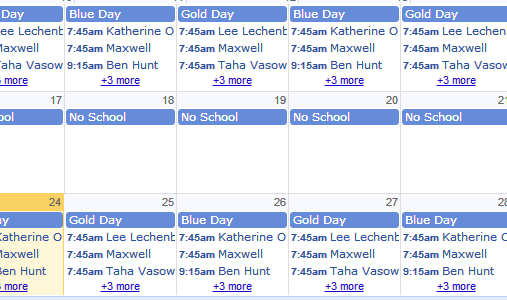


1) First, you want to open the Google Calendar you wish to import. Under “My Calendar” you need to select the Calendar you wish, and go to “Calendar Settings.”
2) Once you are on the Calendar Settings page, Go to the Embed This Calendar tab and copy the text that it provides to you.
3) Go to a page on your Wiki, and when you are in Edit mode, click on the Widget button. A window will open and at the bottom of the navigation menu, there will be a tabbed named “Other HTML.” Go there, and paste the code you copied from your Google Calendar. The Calendar should now appear on your Wiki and will be updated every time you edit your Google Calendar.

Useful Tutorials & Resources On Wikispaces:
YouTube: http://www.youtube.com/watch?v=A_WdD-lIewg
Educational Software: http://educationalsoftware.wikispaces.com/Wikispaces+Tutorial
Wiki Tours: http://www.wikispaces.com/content/wiki-tour

Saturday, February 15, 2014

Instructional Technology and Digital Learning At Andover High School February 10th-14th 2014 - Daniel Downs

Even with a shortened week we were busy making connections and creating new experiences in the Innovation Lab and Instructional technology at Andover High School.


Marketing teacher Karen Stevens started a new semester integrating the web based timeline creator Dipity.com into her courses. This website enables students to create web based presentations in which students upload images,write copy and organized dates into nice graphic timelines.


Mrs.Stevens carefully constructs the lesson by having students develop their ideas and find the images before she introduces the tool. This enables students to have an organized workflow and focus on using the technology without the need to do more research. The students find the timeline creation engaging and enables them to make a variety of connections with events.
View my tutorial on the use of this tool that I created to assist with teachers who want to integrate it.
Beginning With Dipity Part 1


A representative from Burlington High School was on campus to train members of the Digital Learning team and Social Studies teacher Michelle Chaccus with the Ipad application “Net Texts”. This is an application which will allow access to more easily develop lessons and units using “Open Educational Ressources”  often called OER. We expect over the next couple months to support the implementation of this application to better support the use of IPads in the classroom.


On Monday the members of Students government met in the Andover Innovation lab with Dustin Luca from the Andover Townsman to do an article. He was able to get a variety of perspectives on the benefits of the Innovation lab. On Friday he returned to take some photos and meet the students involved in the help desk. We are expecting the article to be on the February 27th edition of the Townsman.


On Tuesday I had the opportunity to assist Tom Powers with the integration of Google Groups into the classroom. He plans on using the web based tool to create web forums for the sharing of documents and written dialogue in his Spanish classroom.  Students immediately accessed the class group and could send a sample reply within the first class it was added. Google groups can enable the organized sharing of materials and responses to questions from the teacher,questions from eachother and a continual forum of responses to sustain engagement in and out of the classroom. Here is a view of a sample interface of Google Groups.


Parents night was on Wednesday and I met many supportive parents who I was able to provide even more background information about the development of the Andover Innovation Lab and help desk. Principal Chris Lord was also able to show me his results from the use of “Poll Everywhere” application which enables real world integration of polling of groups.
The results showed an intense interest in the “use of technology” at the high school which I am glad to see as a topic of interest and look forward to connecting with parents as  we move forward..


In preparation for parents night I worked with Tim VanWey of the Science department in sharing out the link to his presentation for parents which includes links for his contracts and introduction to the course material for the semester. Check this link to see his presentation and corresponding links. This presentation is a great way to share documents and introductory information.
Tim VanWey Science Curriculum Overview

On our snow day I introduced the staff via email the Chrome Apps Store to teachers. This is a deep and excitng teacher resource for a variety of subjects. There are foreign language resources for speaking and science tools with anatomy lessons and vocabulary. The Chrome App(Link Here) store also provides easier access to note taking tools and web based resources for productivity. 

Below is a list of a few of my favorites with descriptions.


This is the Chrome App which enables clipping and saving webpages as images right to your Google Drive. This icon goes right into the browser for snipping websites on the fly. Gives you a great opportunity to collect and organize your web searches as web images.


 The Evernote Web clipper snips webpages and saves them right into your Evernote Account.


Of course Evernote is also available as a Chrome App. Make it even easier to access by adding to your browser.


The UberConference is a great way to bring people together on the web. Invite people using their email or phone number and have an instant conference. Sets up quickly without hassle.

Wednesday, February 12, 2014

Why We Love Chromebooks / Zachary Griffin


The Advantages of a Google Chromebook
Google is one of the biggest multinational corporations in the world, and with its goal of trying to create seamless and universal devices and programs for any type of audience, such as the Google Apps, it only seems fitting that they would create a Chrome-based laptop that takes full advantage of its App interface and cloud-based service.

Cloud-Based Interface
As is the direction Google are going with the Google Docs, the Chromebooks take advantage of the Chrome OS device. An internet-based storage system that stores anything from online video streaming to sharing emails via a social network, is all implemented seamlessly on the Chromebooks.

Despite the several advantages to an always online storage system, this could have its own negative outcome for people who are more protective of their content and don’t feel comfortable pushing their content on an always-online storage space.

Full Advantage of the Google Docs
A more cloud-based online environment is coming, and with big manufacturers like Sony, Apple, and Microsoft utilizing a streamed-based service, Google Docs will become even more efficient in creating and sharing documents in the future. Among the various things that the Google Docs allow you to do, you can also take advantage of its exclusive apps that can used for education such as Quicknote or Scratchpad.

Apps that Instructional Staff can take advantage of using Chromebooks:
  • Google Books
  • SlideRocket
  • Google Docs
  • Google Dictionary
  • Alarm Clock App
  • Zoho Projects

Affordability of a Chromebook versus any other standard laptop
One of the best parts of obtaining a Chromebook is how cheap they are. The Acer Chromebook C720-2848 laptop with an 11.6-inch screen is only $200. Compared to similar laptops from other manufacturers such as a Windows 8.1 Dell, which sells the Asus 13.3-inch laptop at $400 with a lower end Intel Duo processor, the Chromebook, relying more heavily on its streaming service rather than its tech, would not only provide better value, but you wouldn't need to worry about getting hardware upgrades on an always clouded device.

How we, at the Andover Innovation Lab use Google Docs
Google Forms 
We use Google forms to create various spreadsheets and forms that assist us in keeping track of our students progress regardless of where we are and what device we are using, as these are the advantages of a streamed catalog! One of the examples that we use is the Student Attendance sheet which was created using Google Forms.


Google Calendar
Keeping track of our students attendance online for the Help Desk is not only beneficial for us, but also for the students. Using Google Calendar, we posted the Help Desk’s students names and the times and days they are scheduled to attend class on the Calendar, which is set to public so both teachers and students can view it. Using the embed tool the Google Calendar provides, we can also post that Calendar on Wiki Spaces and Blogger so our students can always see it as a useful reminder as to when they are expected to attend our class.


Blogger
Among the many resources the Google Apps provide us, the Google Blogger is among our most used app at the Help Desk. Blogging is an essential way of keeping our viewers and students up to date with the current events of the Help Desk. Students are also asked to post their own blogs regarding their progress on their projects on the Help Desk blogger.


       The Google Apps are essential to the Andover Innovation Lab’s progress, and using the Chromebook interface to take even more advantage of these features would even further its value to both the staff and the students. Chromebooks are affordable, durable, and up-to-date with the newest cloud-based technology, and with Google pushing towards becoming an even more universal technology based company than it already is, Chromebooks will surely prove to be the way to go for education in the near future.

Useful Links for further information on Chromebooks:
https://support.google.com/chromebook/answer/1056325?hl=en
https://sites.google.com/site/chromeoswikisite/home/choosing-a-chromebook
https://sites.google.com/site/chromebookclassroominthecloud/classroom-resources

Andover Innovation Lab Links:
http://andoverhighschoolstudenthelpdesk.blogspot.com/
http://andoverinnovationlabhelpdesk.wikispaces.com/

Monday, February 10, 2014

Eight Suggestions for Formative Projects / Zachary Griffin

     Now that we are on week 3 of the Andover Help Desk with our new students this semester, they are now preparing to enter Phase 2 of their progress. Phase 2 is where the students will be expected to have a design plan laid out, which will show us how they plan on getting what done and when, and several samples of their work from this point. Below is a list of eight suggestions on what they can be working on for their Phase 2 part of their project if it helps them:

Drafts: Drafts are a vital part of any project. Anything that a student has worked on that led them to where they are now is the essence how their project has progressed. While it is not required, a student at the Help Desk could gain a lot of support by looking at some of the resources they developed during their progress on their project.

Info Graphics: These will allow our students to create simple and informative graphics explaining what their outline of their projects are, as well as outlining the various different steps of Phase 2  A convenient and free site to do this is "Easelly.com".

Script and Storyboard: Mainly useful for students working on video projects, creating a short and informative video that explains your progress up to this point is a very efficient way to both show your work and explain where you progress is up to this point.

Videos: Creating video tutorials that showcase your work up to this point is a great way of showcasing your work up to this point. Often times, viewers may not understand what the students project is about and how it works, and creating a tutorial or lecture video on what it is the student is working on is a great way to explain to his/her viewers what they plan to accomplish at the Help Desk.

Tutorials: While creating a video is one of the more efficient ways of showing off a tutorial, creating graphics, charts or other types of forms can also prove to be a useful approach on teaching others about your work. By using Google Forms, a student could create a list of things to know about their project as well as some simple tutorials steps that will help viewers understand more about what they are writing about.

Content Outline: Students who are creating a website or online app may find this useful. By creating a simple form that lists all of your content alongside a sketch of how your project will look with it can help the students understand how they plan on putting forward their content. You can create a form using the Google Docs.

Blogs: While we are always putting out blogs from the students progress every two weeks at the Help Desk, some students may find it useful to create blogs as their way of explaining their progress. Writing up a simple doc telling us where they are and what they plan on doing will help them in many ways.

Location Map: Location maps are similar to info graphics in that they allow for the students to create an image showcasing what their goals are for their project. However, a location map acts more akin to a hierarchy chart which illustrates where and when a students plans on going forward with each part of a project.


While none of these suggestions are required by any of our students for phase 2, it will still prove to be useful if they are looking for an efficient way to present their work and progress up to this point.

Here are a few links to a few valuable sites that can assist students in processing their information:
http://www.easel.ly/ (Easelly is a useful site for trying to create info graphics.)

docs.google.com/ (Create forms using Google Docs.)

http://www.fraps.com/ (A free to use program that allows you to record your PC and create a video)

Sara Adams Andover Innovation Lab Project: Cupcake Website

My name is Sara Adam and I am currently a senior in the Andover Help Desk/Innovation Lab. For my independent project, I will be creating a website for Beachside Bakers, my cupcake company. By the end of this semester, I hope to have a website up and running, where customers can order cupcakes online, as well
as learn about the business. Also, I hope to create a game where people can go on and design their own cupcake, and submit their designs. Each month, we will pick one winner who will win a free half dozen cupcakes with their new design on them.

  So far, I have begun to design a new logo. I have also been planning out the layout of the website and what pages I will have on the site.  The color scheme will be different shades of turquoise, to go along with the beach theme of the company. Although I have not begun actually creating the website yet, I am almost done planning and hope to begin with that soon. Overall, so far I have had a great experience with the Help Desk!